
User Guide
Scan Options
Overview
-
Several of the Target types share Basic and Advanced options.
-
This document also contains email-related options and discovery team settings.
Basic Options
Note: These settings are not available for Database Targets.
Basic options apply to the following Target types:
-
Cloud
-
Files & Folders (Local & Remote Scans)
-
Email
-
Collaboration Tools
-
Website
Info:
-
For information on the target type-specific options, see the individual Target type sections in Create a New Sensitive Data Scan.
-
Cloud, Files & Folders, Email, Collaboration Tools, and Website Target types all have options specific to their type.
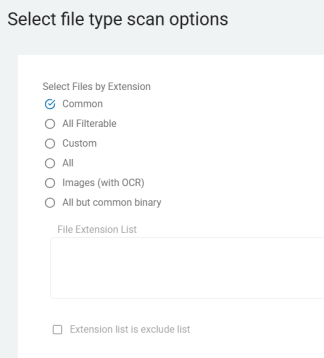
Select Files by Extension
-
A list of extensions to include or exclude during the search.
-
The values are entered one per line as ext;1 to specify that the extension "ext" should be enabled for the list.
-
Extensions should be entered in lowercase.
-
File types to search:
-
Common
-
Microsoft Windows
-
Only search Microsoft Office, Adobe Acrobat PDF, text, web, and other common formats.
-
File types include:
-
.1st, .asm, .asp, .aspx, .btm, .c, .cc, .cpp, .cs, .css, .cxx, .def, .dic, .h, .hpp, .hxx, .idl, .idq, .inc, .inf, .ini, .inx, .java, .jsl, .log, .me, .rc, .reg, .rels, .snippet, .text, .txt, .url, .wtx, .xml, .xsl, .pdf, .edn, .fdf, .xdp, .xfd, .xfdf, .htm, .html, .rtf, .7z, .gz, .tar, .z, .rar, .bz, .bz2, .tgz, .tbz, .tbz2, .zip, .doc, .dot, .xls, .xla, .xlb, .xlc, .xld, .xlk, .xll, .xlm, .xlt, .xlv, .xlw, .dif, .slk, .ppt, .pot, .ppa, .pps, .pwz, .docx, .docm, .dotx, .dotm, .xlam, .xlsx, .xlsm, .xltm, .xltx, .pptm, .pptx, .potx, .potm
-
-
-
macOS
-
Mac Agent uses Spotlight to detect how to process files
-
Common extensions include:
-
Plugin name:/System/Library/Spotlight/PDF.mdimporter
-
Plugin key:PDF
-
UTIs:
-
com.adobe.pdf
-
-
Plugin name:/System/Library/Spotlight/RichText.mdimporter
-
Plugin key:RichText
-
UTIs:
-
public.rtf
-
public.html public.xml
-
public.plain-text
-
com.apple.traditional-mac-plain-text
-
com.apple.rtfd com.apple.webarchive
-
org.oasis-open.opendocument.text
-
public.comma-separated-values-text
-
public.delimited-values-text
-
public.comma-separated-values-text
-
public.delimited-values-text
-
public.text
-
public.html
-
public.xml
-
public.plain-text
-
com.apple.traditional-mac-plain-text
-
org.oasis-open.opendocument.text
-
-
Plugin name:/System/Library/Spotlight/Office.mdimporter
-
Plugin key:Office
-
UTIs:
-
org.openxmlformats.wordprocessingml.document
-
org.openxmlformats.wordprocessingml.template
-
org.openxmlformats.wordprocessingml.document.macroenabled
-
org.openxmlformats.wordprocessingml.template.macroenabled
-
org.openxmlformats.spreadsheetml.sheet
-
org.openxmlformats.spreadsheetml.template
-
org.openxmlformats.spreadsheetml.sheet.macroenabled
-
org.openxmlformats.spreadsheetml.template.macroenabled
-
org.openxmlformats.presentationml.presentation
-
org.openxmlformats.presentationml.template.macroenabled
-
org.openxmlformats.presentationml.template
-
org.openxmlformats.presentationml.presentation.macroenabled
-
org.openxmlformats.presentationml.slideshow
-
org.openxmlformats.presentationml.slideshow.macroenabled
-
com.microsoft.powerpoint.ppt
-
com.microsoft.powerpoint.pot
-
com.microsoft.powerpoint.pps
-
com.microsoft.excel.xls
-
com.microsoft.excel.xlt
-
com.microsoft.excel.xla
-
com.microsoft.word.doc
-
com.microsoft.word.dot
-
com.microsoft.excel.openxml.addin
-
com.microsoft.excel.openxml.template
-
com.microsoft.excel.openxml.workbook
-
com.microsoft.excel.openxml.template.macro-enabled
-
com.microsoft.excel.openxml.workbook.binary
-
com.microsoft.excel.openxml.workbook.macro-enabled
-
com.microsoft.powerpoint.openxml.presentation
-
com.microsoft.powerpoint.openxml.presentation.macro-enabled
-
com.microsoft.powerpoint.openxml.slideshow
-
com.microsoft.powerpoint.openxml.slideshow.macro-enabled
-
com.microsoft.powerpoint.openxml.template
-
com.microsoft.powerpoint.openxml.template.macro-enabled
-
com.microsoft.word.openxml.document
-
com.microsoft.word.openxml.document.macro-enabled
-
com.microsoft.word.openxml.template.macro-enabled
-
org.openxmlformats.presentationml.presentation.macroenabled
-
org.openxmlformats.presentationml.slideshow
-
org.openxmlformats.presentationml.slideshow.macroenabled
-
org.openxmlformats.presentationml.template
-
org.openxmlformats.presentationml.template.macroenabled
-
org.openxmlformats.spreadsheetml.sheet
-
org.openxmlformats.spreadsheetml.sheet.macroenabled
-
org.openxmlformats.spreadsheetml.template.macroenabled
-
org.openxmlformats.wordprocessingml.document
-
org.openxmlformats.wordprocessingml.document.macroenabled
-
org.openxmlformats.wordprocessingml.template
-
org.openxmlformats.wordprocessingml.template.macroenabled
-
-
-
-
-
All Filterable
-
In addition to Common and image files, also search files for which you have a Windows IFilter.
-
-
Custom
-
Search the files with the extensions you choose.
-
-
All
-
Search all extensions.
-
-
Images (with OCR)
-
Only search image files such as JPG and GIF with Optical Character Recognition (OCR).
- If the OCR Image Search Module is not licensed or the OCR files are not present and "Images (with OCR)" is selected, the search defaults to "Common."
Note: "Images (with OCR)" is only available for the Windows endpoint and is a valid option only in a policy when the endpoint is licensed to and includes the OCR Image Search Module.
-
-
All but common binary
-
Search all files except binary files such as EXE, DLL, or MP3.
-
-
File Extension List
-
A list of extensions to include during the search.
-
The values are entered one per line as ext;1 to specify that the extension "ext" should be enabled for the list.
-
Extensions should be entered in lowercase.
-
To make the list a list of excluded extensions check the box next to Extension list is exclude list.
Use Advanced File Identification
-
By default, the endpoint application uses file extensions to identity file types and select an appropriate filter.
-
To change that behavior and use advanced file type identification, set this value to something other than, "Disable" (0).
-
When enabled, the client will look at the header information of files (magic numbers) to determine their type.
-
While this method is more accurate, it will also cause a decrease in search speed due to the increased processing.
-
The valid values are:
-
0: Disable
-
File extensions are used to determine file type
-
-
1: E-Mail Attachment Compressed Files
-
Analysis is only performed on e-mail attachments to determine if they are renamed compressed files
-
-
2: Included File Types
-
Analysis is performed on any file whose extension is included in the list of file types to search.
-
The file will be searched if its type in included in the list of file types to search.
-
-
3: All Files
-
Analysis will be performed on all files and any file whose type is included in the list of file types to search is searched
-
-
-
Analyze Files by
-
The type of analysis to perform when analyzing files.
-
Use this setting to enable or disable one or more of the analysis types when searching files.
-
"Analyze file content" is enabled by default and represents the behavior of search prior to version 8.0.
-
The analyze files options:
-
Analyze File Content - Default search to look through all data within a file for sensitive data.
-
Compare File Hash - Search for a representation of a file regardless of name or location.
Note: It is not possible to get a file hash match on compressed files or access databases.
-
Analyze File Name - Search for sensitive data within file names.
-
Analyze File Metadata - Search for sensitive data within the metadata of Office and PDF files.
-
Advanced Options
These settings are not available for Database Targets.
Advanced options apply to the following Target types:
-
Cloud
-
Files & Folders (Local & Remote Scans)
-
Email
-
Collaboration Tools
-
Website
Skip files as text free binary
-
This setting determines the identification method used to skip a file type.
-
By default, when advanced file identification is enabled via UseAdvancedFileIdentification and a file is determined to be a common binary file type, it is searched if the file type is included in the scope of files to search as determined by the FileTypeSearchOption setting.
-
For example, if the FileTypeSearchOption setting is configured to search all files, the file is searched.
-
If it is desirable to skip the file in this instance, set this to "Skip" (1).
-
Note: The list of common text free binary file types is noted in the settings file located at: Locations\Files\FileExtensions\TextFreeBinaryFileExtensionExcludeList
Disable max file size for Access Database files
-
This setting disables testing the size of Microsoft Access database files.
-
By default, all file types (other than PST E-Mail files and compressed archive files) are tested against the MaxFileSize setting to determine if they should be searched.
-
Because Access database files are not searched under the same memory requirements as other file types, large Access database files can be searched.
-
To ignore the MaxFileSize setting for Access database files, set this to "Do not test file size" (1)
Set Max Memory File Size
-
This setting sets the maximum size of files that are stored in memory (in bytes).
-
Default: 32 MB
-
Because the value is specified in bytes, multiply the desired number of megabytes by 1048576 to determine the appropriate number of bytes.
-
For example, the default value of 33554432 bytes is 32*1048576.
-
-
The maximum value for this setting is 134217728 which equals 128 MB
-
A value greater than 128 MB can cause stability issues as the amount of memory that can be allocated to a process is controlled by windows.
-
Spirion strongly recommends that this number be under 134217728 (128 MB).
-
Max File Size
-
This setting specifies the maximum file size to search (in bytes).
-
To search files greater than the default (32 MB), change this value.
-
Because the value is specified in bytes, multiply the desired number of megabytes by 1048576 to determine the appropriate number of bytes.
-
For example, the default value of 33554432 bytes is 32*1048576.
-
-
The maximum value for this setting is 134217728 which equals 128 MB
-
A value greater than 128 MB can cause stability issues as the amount of memory that can be allocated to a process is controlled by windows.
-
Spirion strongly recommends that this number be under 134217728 (128 MB).
-
Enable Max Compressed File Size
-
This setting specifies the maximum size of compressed files to search (in bytes).
-
By default, any searchable file is extracted from compressed files regardless of the size of the archive itself.
-
To skip the processing of archives larger than a specified size, set this value to a number greater than 0.
-
This value is only read when EnableMaxCompressedFileSize is set to "Enable" (1).
-
Because the value is specified in bytes, multiply the desired number of megabytes by 1048576 to determine the appropriate number of bytes
Enable Scan Byte Limit
-
This setting controls whether to enforce a size limit on each file scanned (in bytes)
-
By default, the endpoint application searches each file in its entirety.
-
To search only the first specified number of kilobytes in each file, set this value to "Enable" (1) and set the value SearchByteLimit to a number greater than 0.
OCR
Enable OCR for Files
-
Search supported file types via OCR.
-
By default, when OCR is licensed, the supported file types are searched via the OCR module.
-
To disable searching with OCR, set this to "Do not search" (0).
Decomposition Mode
-
The method used to perform page analysis.
-
Different methods/algorithms can be used to analyze the page before performing the OCR.
-
By default, the method is selected automatically, but if the default setting is not producing acceptable output at an acceptable speed, a specific method can be forced.
-
Valid options are:
-
Auto (0):
-
The engine automatically determines the algorithm to use.
-
This is the default setting and produces the best output for the widest array of images and image types.
-
-
Legacy (1):
-
The engine uses simple page decomposition which generally executes faster than standard but does not produce as accurate results.
-
-
Standard (2):
-
The engine uses standard page decomposition which generally produces better results than legacy but may execute slower.
-
-
Fast (3):
-
The engine uses fast page decomposition which generally executes the fastest of the methods
-
Produces the least accurate results unless the images are very simple representations of text.
-
Performs the least amount of page analysis
-
Does not work well for forms, tables, differing font sizes, and so on
-
-
Deskew
-
Automatically align skewed text.
-
By default, if an image appears to be skewed or angled, an attempt is made to straighten the image to improve the likelihood of obtaining accurate text.
-
To disable deskewing (which will increase speed if it is known that no images are skewed), set this to "Off" (0).
Despeckle
-
Enhance image quality to reduce pixel artifacts.
-
It may be possible to improve the accuracy of text extracted from certain images by first attempting to remove information that does not appear to be part of a valid character.
-
This setting specifies whether the adaptive noise removal algorithm will be activated for black and white images with a resolution of 280 DPI or higher.
-
This setting might influence the recognition accuracy.
-
To enable despeckling, set this to "On" (1).
Document Type
-
The type of text included in the target locations.
Machine Text/Handwritten Characters/Both Machine Text and Handwritten Characters
-
By default, the OCR module recognizes machine generated text and does not recognize handwritten characters.
-
If the desired data is known to be comprised of only handwritten characters, set this to "Handwritten Characters" (2).
-
If is it necessary to identify both machine text and handwritten characters, set this to "Both Machine Text and Handwritten Characters" (3).
Note: If the input text type is known, it is more efficient to specify Machine Text or Handwritten Characters, as appropriate.
Scan All Pages/Scan Only This Page
-
Search all pages or only search the specified page number.
-
By default, all pages of an image are processed with OCR.
-
In some cases, it may be desirable to only search a specific page such as the first or second page.
-
To only search a specific page for all files processed via OCR, set this to a number greater than 0.
OCR PDFs
-
The method to use for searching PDF files when OCR is enabled.
-
By default, an attempt is made to extract readable text from a PDF file.
-
If there is no readable text, OCR is used to attempt to identify text.
-
To prevent OCR from being used when there is no text, set this to "Text only" (0).
-
To always use OCR and not attempt to extract readable text, set this to "OCR Always" (2).
-
If there are both text and images in the PDF, only the text or the images are searched, based on the method selected.
-
Text only
-
OCR when no text
-
OCR Always
-
Fax Correction
-
Enhance scanned faxes.
-
When fax correction is enabled, the resolution of black and white images with an approximate resolution of 200 x 100 DPI is doubled in the y direction (vertically) in an attempt to improve character recognition.
-
To enable fax correction, set this to "Enable" (1).
Invert
-
Swap black and white pixels before performing OCR.
-
When enabled, black and white images are inverted from black on white to white on black.
-
In some cases, this can improve the recognition.
-
To enable inversion, set this to "Enable" (1).
Recognition Mode
-
The method to use for character recognition.
-
When performing character recognition, there is a trade-off between speed and accuracy.
-
By default, accuracy is favored. To favor speed, set this to "Favor speed" (1).
-
Favor accuracy
-
Favor speed
-
Resolution Enhancement
-
Enhance resolution when recognizing color images.
-
When enabled, the resolution enhancement algorithm results in an image whose resolution is higher than the resolution of the original image.
-
This is done on the basis of information taken from the extra pixel depth in the grayscale and color images and may impact recognition accuracy.
-
To enable resolution enhancement, set this to "Enable" (1).
Note: This setting only applies to non-black and white and non-palette color images.
Rotation
-
Rotate images before performing OCR.
-
By default, an attempt will be made to determine if an image is rotated 90, 180, or 270 degrees before recognition.
-
To disable automatic rotation (which will increase speed if it is known that all text is "right-side-up"), set this to "Off" (0).
Unknown Character Replacement
-
The character to use when a character is not recognized.
-
Specify which character is to be used as a symbol for any characters that are not recognized by the OCR module.
-
By default, no character is displayed.
-
By selecting a different character, such as the tilde character, it will be easier to see which characters were not recognized.
-
The values that correspond to the settings in the endpoint UI are:
-
No Character
-
Space
-
Other characters may be specified.
-
Additional Languages
-
Languages other than English to recognize during a search with OCR.
-
By default, only English characters are recognized when performing a search with OCR.
-
To recognize characters from additional languages, select each desired language.
-
Spanish
-
French
-
German
-
Note: Each additional language has an impact on the performance of the recognition and therefore languages that are known not to be present in the target locations should not be enabled.
Advanced Options, Second Screen
The additional or second screen of Advanced options apply to the following Target types:
-
Cloud, Files & Folders (Local & Remote), Email, Collaboration Tools (SharePoint & Bitbucket), Database, and Website Target types.
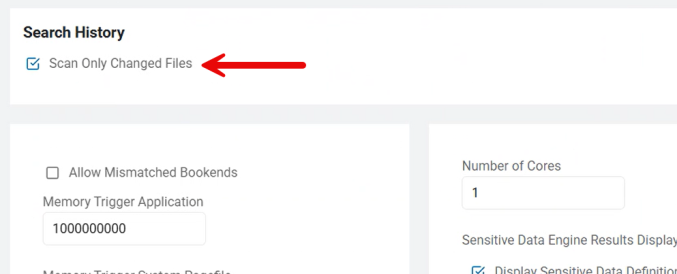
Scan Only Changed Files
-
Under Search History is the option Scan Only Changed Files. See the image above.
-
This is the Differential Scanning setting
New in version 13.4 is a feature called Differential Scanning.
Differential scanning:
- Is enabled by default for new scans using v13.4 or later agents
- Scans only files that have changed since the last scan
- Scans all the files in your Target when the initial scan is performed
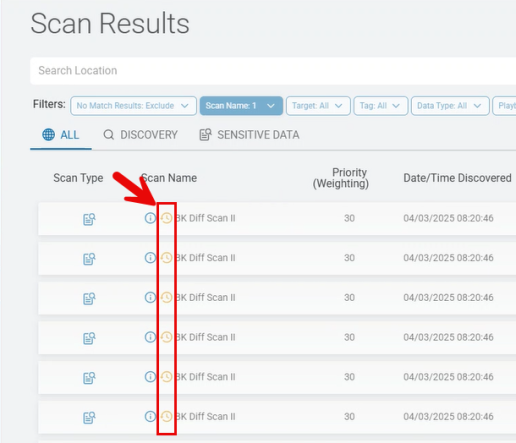
- When scans are complete, skipped (unscanned) files are marked with an icon on the Scan Results screen. See the image "Scan Results with Skipped Locations" below.
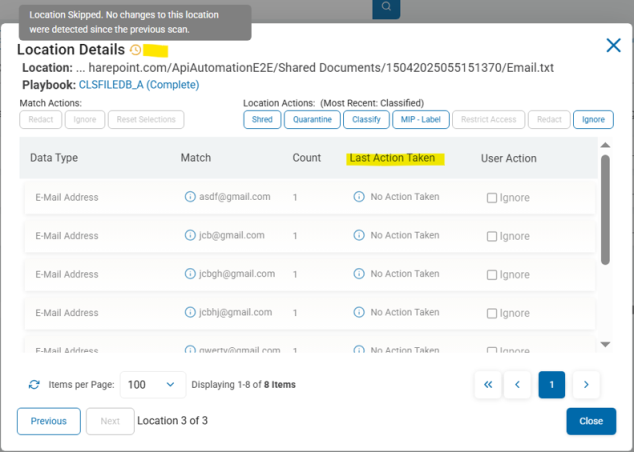
- Details of skipped locations: Open the skipped location from the Scan Results page for additional details. See the image "Skipped Location Details" below.
Gmail and Exchange: Email Drafts and Attachments
-
Gmail and Exchange sources: With Differential Scanning enabled (it is enabled by default), when scanning either Exchange or Gmail locations, emails in draft form as well as attachments to such emails are always scanned, regardless of their state of change.
-
Emails and attachments are never marked to be skipped.
-
Impact of Classification
-
Important! Given that Differential Scanning is enabled (it is enabled by default), locations/files which are classified by SDP during a scan are not marked for rescanning as the location/file has not been altered, and can therefore be skipped during the next scan, assuming no other changes are made.
Impact of Redaction
-
Important! Given that Differential Scanning is enabled (it is enabled by default), and sensitive information in locations/files are redacted by SDP, then the locations/files are still marked for rescanning regardless of any other changes being made.
-
Marking redacted files to be skipped by subsequent scans would result in playbook rules being unenforced.
-
Impact of AnyFind Definition Change
-
Important! If your Agent is updated and this includes a change to AnyFind logic (the AnyFind definition file changes) all existing Search History is invalidated.
Scan Results with Skipped Locations
Skipped Location Details
-
Note the Location Details in the screenshot below and the details under the column Last Action Taken
Supported Sources
-
Amazon S3
-
Box
-
Dropbox
-
Exchange
-
Exchange Online
-
Gmail
-
Google Drive
-
OneDrive
-
Local files and folders
-
Remote files and folders
-
SharePoint
-
SharePoint Online
Unsupported Sources
-
Any Database
-
BitBucket
-
OLEDB
-
ODBC
-
Website
Allow Mismatched Bookends
-
Allow special characters before and after a match to differ.
-
When using AnyFind, any endpoint application requires that special characters (such as open parentheses, open square bracket, and so on), before a match, also expects to see the corresponding character after the match.
-
To disable this check and allow the leading and trailing characters to be any valid delimiter, set this value to "Allow" (1).
Memory Trigger Application
-
The number of bytes allocated to the application before the search is paused.
-
By default, the endpoint pauses the search if the number of bytes allocated to the application reaches 1000000000 (approximately 1 GB).
-
Because of the type and amount of memory required to conduct the search, searching generally fails when this allocation of memory has been reached.
Memory Trigger System Pagefile
-
Percentage of the system page file remaining before the search is paused.
-
By default, the endpoint pauses the search if the system page file has 10% or less space available.
-
Because of the type and amount of memory required to conduct the search, searching will generally fail when the page file is low.
Prevent Suspension During
-
Prevent automatic suspension while searching.
-
By default, the endpoint respects the Windows power settings and therefore a search may become paused if the computer enters sleep during a search.
-
To prevent the computer from sleeping while a search is in progress, set this to "Prevent Suspension" (1).
Note: This setting only prevents sleeps caused by power plans.
It does not prevent Screen Savers and it does not prevent suspensions caused by the user such as by closing a laptop screen or pressing the power button.
Run Low I/O Priority
-
Run the endpoint application with a lower I/O priority.
-
To lower the I/O priority of the endpoint application to give preference to other running, foreground applications, set this value to "Enable" (1).
Run Low Process Priority
-
Run the endpoint application with a lower priority.
-
To lower the priority of the endpoint application to give preference to other running, foreground applications, set this value to Enable (1).
Number of Cores
-
Use all available or a specified maximum number of processor cores during the search.
-
By default, the search uses all available CPU cores when searching for AnyFind and OnlyFind information within a location.
-
The valid values are:
-
0: Use only a single CPU core
-
1: Default. Use all available cores
-
>1: Use a maximum of this many processor cores.
-
For example, on a system with 8 cores, set this value to 4 to limit the search to a maximum of 4 cores.
-
-
Sensitive Data Engine Results Display
-
Specify which results are displayed when a Sensitive Data Definition is matched.
-
When displaying results from a Sensitive Data Definition, the default behavior is to show only the definition name itself in the results.
-
To display all the matching types, select "Display All Matching Result Types" (2).
Note: If only Display Sensitive Data Definition Name is selected, no match preview information is sent to the console.
One or both of the options must be selected.
If no option is selected, no results are displayed.
Display Sensitive Data Definition Name
-
Specify which results are displayed when a Sensitive Data Definition is matched.
-
When sensitive data definitions have been created on the Console and applied to an endpoint via policy, it is possible to control the data types that the endpoint can search.
-
By default, the Sensitive Data Engine ribbon button will be visible and selectable.
-
Selecting the button will cause the search to use only the sensitive data definitions applied via policy and will disable any AnyFind or Custom Types.
-
Deselecting the ribbon button will allow the interactive user to disable the sensitive data definitions and enable AnyFind or Custom Types via the UI (or use those set via policy).
-
To force the Sensitive Data Engine to run and only use the sensitive data definitions, set this to "Enabled" (1).
-
To hide the Sensitive Data Engine button and prevent the use of sensitive data definitions, even if they have been applied via policy, set this to Hidden (2)
Display All Matching Result Types
-
Specify which results are displayed when a Sensitive Data definition is matched.
-
When displaying results from a Sensitive Data Definition, the default behavior is to show only the definition name itself in the results.
-
To display all the matching types, select Display All Matching Result Types (2).
Note: If only Display Sensitive Data Definition Name is selected, no match preview information is sent to the console.
One or both of the options must be selected.
If no option is selected, no results are displayed.
Restore Original Modified Timestamp
-
Reset the timestamps on files after performing actions.
-
When the endpoint application performs actions on a location, it can affect the timestamps of those files.
-
For example, redacting a document updates the Last Modified Date.
-
To have the endpoint record the timestamp before performing an action on the file and then reset it back to those values after the file is modified, select one or more actions.
-
It is important to note that this is only reliable on local, NTFS file systems.
-
It is likely to work on remote NTFS file systems; however, for non-Windows file systems, this reset can be unreliable and there is no indication that the reset was not correct.
-
It is known that some versions of SAMBA incorrectly report the values of the remote files causing their reset to be inaccurate.
Note: This setting does not affect cloud storage locations.
This setting does affect locations that are manually redacted or manually classified.
-
Specify the timestamp types to use.
-
When selected the settings in the corresponding category are applied when they are enabled.
Example
-
If Modified Date is selected then the file restriction, older than file restriction, e-mail restriction, and older than e-mail restriction settings in the ModifiedDate category are used when their corresponding Enable flag (EnableFileRestriction, EnableFileRestrictionOlderThan, EnableEmailRestriction, EnableEmailRestrictionOlderThan) is set to (1).
-
Restore Classification Modified Timestamp
-
Restore Redact Modified Timestamp
Note: This setting does not affect cloud storage locations.
This setting does affect locations that are manually redacted or manually classified.
Access Bitness
Specify the bitness of the installed version of Access.
-
When a 64-bit version of Microsoft Office is installed, a specific value is written into the Windows registry to indicate this.
-
Under normal circumstances, the bitness of Office is the same as the bitness of Access.
-
However, if Office is 64-bit but Access is 32-bit, the registry value is read and it is assumed that Access is 64-bit (because Office is) and there is a failure to load the proper resources to search within Access database files.
-
Similarly, if Office is 32-bit but Access is 64-bit, it is assumed that Access is 32-bit (because the registry value does not exist) and the Access database file search does not operate properly.
If it is known that the bitness of Access differs from the bitness of Office, set this to "Force 32 bit" (1) or "Force 64 bit" (2), as appropriate.
-
Auto Detect
-
Force 32-bit
-
Force 64-bit
Match Preview Length
-
The number of characters before and after a database match to send to console.
-
To provide context to matches when viewing results on the console, version 10.7 and later of the endpoints and console can send the specified number of characters from before and after the match itself.
-
By default, no characters preceding or following database matches will be sent to the console.
-
The maximum allowed number of characters is 1000 and a value of 0 will disable sending preview information to the console.
Valid values:
-
0: Disabled (no preview data will be sent to the console)
-
1-1000: The specified number of characters from before and after the database match will be sent to the console
-
>1000: Invalid (the value will be set back to the default of 20)
Note: When Console\sendMatch is set to Disable (0), preview information is not be sent to the console.
Preview Match Maximum Instances
-
The maximum number of instances of a database match for which to include preview data.
-
For full explanation see Math Preview Length.
Note: When Console\sendMatch is set to Disable (0), preview information is not sent to the console.
Send Only Last Four Characters
Send only the last four characters of the match string to the console.
-
By default, the entire match string is sent to the console.
-
When sendMatch is disabled, this setting has no effect.
To send only the last 4 characters (or all characters if the match string is 4 characters or less), set this value to Enable (1).
-
Disabled/Entire match (Default)
-
Last four only
-
Last four only (and first six for CCNs)
Note: Send Match and Send Only Last Four Characters options only display if Sensitive Data Finder feature is disabled.
-
For information on specific options for a specific target type, see Create a New Sensitive Data Scan.
-
These options also apply to the Create a New Discovery Scan process.
Compressed Files
Scan email and compressed files.
Include Dumpster Folder
-
Microsoft Exchange Server uses a special folder to facilitate discovery efforts.
-
Prior to Exchange Server 2013, this was called the dumpster; starting with Exchange Server 2013, the folder is called the Recoverable Items folder.
-
To include this folder in the Exchange Server search, set this to "Include dumpster folder" (1).
-
The Dumpster / Recoverable Items folder is used by these Exchange features:
-
Deleted item retention
-
Single item recovery
-
In-Place Hold
-
Litigation hold
-
Mailbox audit logging
-
Calendar logging
-
Search All Mailboxes
-
To enable the searching of only specific Exchange Server mailboxes, set this value to "Search specified mailboxes" (1).
Compressed Files
-
To disable the searching of compressed files, set this value to "Disable Compressed File search" (0).
MBox
Search by extension
-
To enable the searching of files with the extensions specified in the MBOXFiles value as MBOX mail files, set this value to "True" (1).
Search specific files / folders
-
To enable the searching of files and/or folders specified in the MBOXLocationList as MBOX mail files, set this value to "True" (1).
Scan Microsoft Outlook
-
To disable the inclusion of Outlook and Exchange in the e-mail search, set this value to "False" (0).
Scan Windows Mail
-
To enable the inclusion of Outlook Express or Windows Mail in the e-mail search, set this value to "True" (1).
Thunderbird
-
To enable the inclusion of Mozilla Thunderbird in the e-mail search, set this value to "True" (1).
The search method to use for Thunderbird mbox files:
-
Only use MSF file (if MSF does not exist, skip mail folder)
-
Try MSF, if MSF does not exist, directly read mbox file (Default)
-
Ignore MSF and always read directly from mbox file
Exchange / Outlook Options
Set Outlook Bitness
-
When a 64-bit version of Microsoft Office is installed, a specific value is written into the Windows registry to indicate this.
-
Under normal circumstances, the bitness of Office is the same as the bitness of Outlook.
-
However, if Office is 64-bit but Outlook is 32-bit, the registry value will be read and it will be assumed that Outlook is 64-bit (because Office is) and there will be a failure to load the proper resources to search within Outlook.
-
Similarly, if Office is 32-bit but Outlook is 64-bit, it will be assumed that Outlook is 32-bit (because the registry value does not exist) and the Outlook search will not operate properly.
-
If it is known that the bitness of Outlook differs from the bitness of Office, set this to "Force 32 bit" (1) or "Force 64 bit" (2), as appropriate.
PST
-
Specify when to search unattached PST files.
Search Detached
-
To enable the ability to search PST files that are not attached to an existing profile, set this value to "True" (1).
Skip PST on remote drive
-
This setting only applies to Outlook stores attached to an active profile; it is not applicable to detached PSTs.
-
By default, when configured to search Outlook, all of the stores will be searched.
-
If the PST for one of those stores is on a remote network drive and it is not desirable to allow that connection, that store can be skipped by setting this value to Skip (1).
Search detached Zimbra
Note: This setting is highly dependent on the configuration and format of Zimbra mail files and is not guaranteed to work.
Troubleshooting assistance and support for this setting are not available.
Info: When Settings\Locations\Email\Microsoft\SearchDetachedPST is set to True (1), it is possible to attempt to search .zdb files, by treating them as PST files and automatically attaching them to the current Outlook profile.
To attempt to attach .zdb files to the current Outlook profile and search them as pst files, set this to "Include in search" (1).
Search Selected Outlook Folders
-
System generated list of GUIDs for all available Outlook and Exchange e-mail folders.
Exclude Exchange Public Folders
-
To exclude Exchange public folders from the Outlook/Exchange search, set this value to "True" (1).
Exclude IMAP Folders
-
To exclude IMAP folders from the Outlook/Exchange search, set this value to "True" (1).
Search only Cached Exchange stores
-
By default, the endpoint application will attempt to search all Outlook E-Mail stores connected to an Exchange Server when the setting "Search Remote Mail Folders" is set to "True".
-
To only search those stores that are configured to use cached mode and skip all other stores, change this setting to "Search only cached stores."
Discovery Team Settings
-
These settings are available when you select more than one agent for your scan.
Cloud Storage Analysis Type
-
The type of analysis to perform when analyzing Cloud Storage for Discovery Team searches.
-
Specify the method to be used when analyzing Cloud Storage locations for inclusion in a Discovery Team search.
-
Count by Bytes (0:Default)
-
Count and report by bytes in each cloud storage folder.
-
The workload will be divided by folders based on the size of the files/objects stored within them.
-
-
Count by Items (1)
-
Count and report by number of items in each cloud storage folder.
-
The workload will be divided by folders based on the number of files/objects stored within them.
-
Exchange Analysis Type
-
The type of analysis to perform when analyzing Exchange for Discovery Team searches.
-
Specify the method to be used when analyzing Microsoft Exchange locations for inclusion in a Discovery Team search.
-
Count by Bytes (0)
-
Count and report by bytes in each Microsoft Exchange mailbox folder.
-
The workload will be divided by folders based on the size of the files/objects stored within them.
-
-
Count by Items (1:Default)
-
Count and report by number of items in each Microsoft Exchange mailbox folder.
-
The workload will be divided by folders based on the number of files/objects stored within them.
-
-
Count by Mailboxes (2)
-
Count and report by the number of Microsoft Exchange mailbox users.
-
The workload will be divided by number of mailboxes.
-
File System Analysis Type
The type of analysis to perform when analyzing File Systems for Discovery Team searches.
-
Specify the method to be used when analyzing File System locations for inclusion in a Discovery Team search.
-
Count by Bytes (0:Default):
-
Count and report by bytes in each File System folder.
-
The workload will be divided by folders based on the size of the files/objects stored within them.
-
-
Count by Items (1):
-
Count and report by number of items in each File System folder.
-
The workload will be divided by folders based on the number of files/objects stored within them.
-
Gmail Analysis Type
The type of analysis to perform when analyzing Gmail for Discovery Team searches.
-
Specify the method to be used when analyzing Gmail locations for inclusion in a Discovery Team search.
-
Count by Bytes (0):
-
Count and report by bytes in each Gmail folder.
-
The workload will be divided by folders based on the size of the files/objects stored within them.
-
-
Count by Items (1:Default):
-
Count and report by number of items in each Gmail folder.
-
The workload will be divided by folders based on the number of files/objects stored within them.
-
-
Count by Users (2):
-
Count and report by the number of Gmail users.
-
The workload will be divided by user account.
-
SharePoint Analysis Type
The type of analysis to perform when analyzing SharePoint for Discovery Team searches.
-
Specify the method to be used when analyzing SharePoint locations for inclusion in a Discovery Team search.
-
Count by Bytes (0:Default):
-
Count and report by bytes in each SharePoint folder.
-
The workload will be divided by folders based on the size of the files/objects stored within them.
-
-
Count by Items (1):
-
Count and report by number of items in each SharePoint folder.
-
The workload will be divided by folders based on the number of files/objects stored within them.
-